An Expression of Art

Showing posts with label Cake Styling. Show all posts

Tuesday, August 16, 2011

How to Cover a Cake with Fondant

How to Cover a Cake with Fondant
You'll need:

Prepare your cake with a light layer of icing.

Prepare your fondant mat by rubbing a small amount of Crisco to your mat.  Remember, a little goes a long way.  It should be a very thin layer.  This will help your fondant from sticking to the mat and will make the fondant in contact with the mat shinier.  I also prep the rolling pin with a little crisco and dust some cornstarch over it in order to avoid a "sticky situation".

After cutting your fondant piece you have to knead the fondant to make it more pliable (like you would with dough) and be able to roll it. The fondant will be ready once it becomes more pliable and the fondant looses its shine (i.e., becomes opaque).  Do not overknead as the fondant can start to melt (hands expell body heat) and become sticky, therefore, work as fast as you can.  If this occurs, add a little cornstarch to your fondant.  Most decorators use a corn starch "puff".  Here is a link to "Working with Fondant" for quick tips. 


After kneading the fondant, roll it into a ball and place in the middle of your fondant mat.  I recommend using a fondant mat to achieve a smooth surface. 


TIP: It is difficult for me to roll the fondant flat out of a ball.  I recomment that you pat the fondant ball until it flattens on the mat as shown on the picture below.  Then you are ready to roll the fondant.


In this picture I was covering a round 8 inches in diameter cake that was 4 inches high, therefore I had to sum each side and the top --> [4 inches (side) + 8 inches (diameter) + 4 inches (other side) = 16 inches].  Since the total was 16 inches, I had to roll my fondant until it was 16 inches in diameter in order to be able to cover my round 8 inches in diameter cake. 


Roll the fondant from center to the edge to keep the circular shape of the fondant (do not roll from edge to edge). Feel free to rotate the fondant.


Once you are done rolling the fondant, we have to transfer the fondant onto the top of the cake (make sure your already frosted cake is near your rolled fondant for easier transfer). ***Butter Cream Recipe***


Roll the rolled fondant on your rolling pin so you can gently lift it and place one edge of the fondant over one edge of the cake. Slowly unroll the fondant over the cake (make sure it is centered).


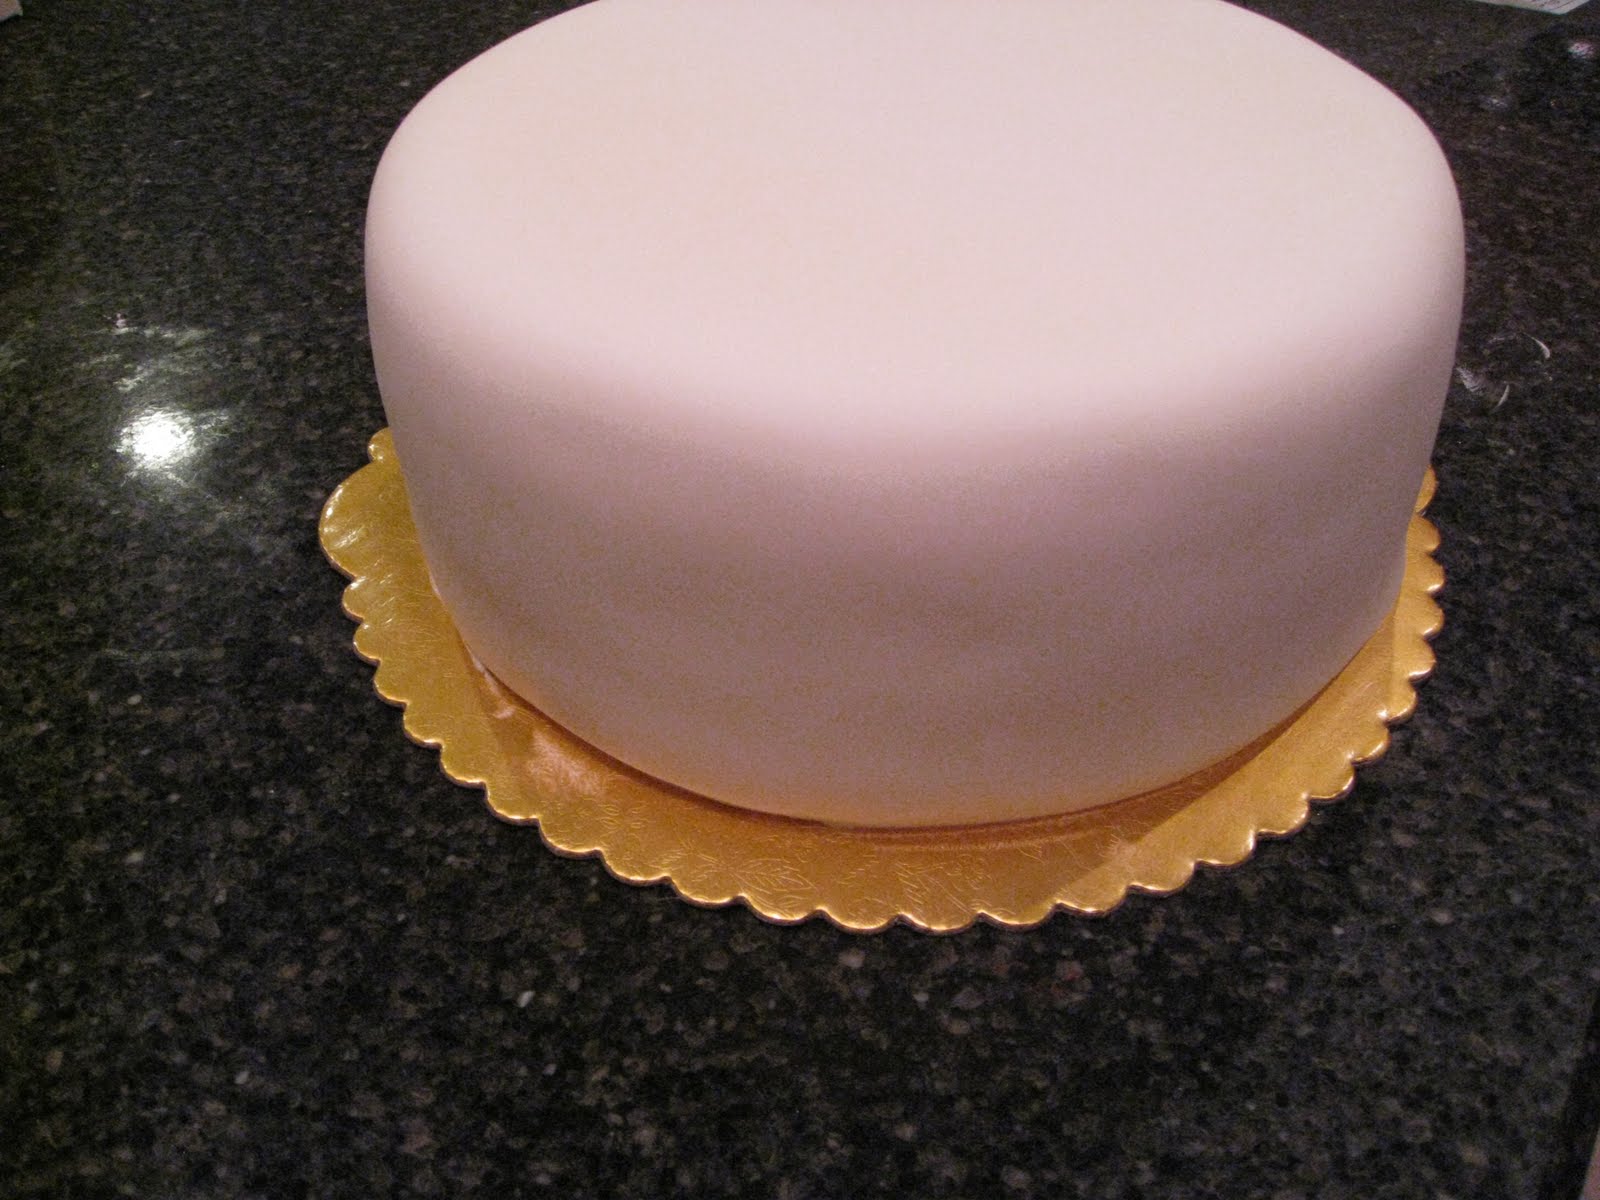
The fondant should drape the cake as shown in this picture.


Shape the fondant to the side of the cake by gently smoothing it with your hands starting on the top center of the cake and outwards and then the sides.  Hands can leave impressions on the cake so make sure you do this gently or use a Fondant Smoother


Press the bottom of the cake to mark the edge and make it easy to trim.


Trim the excess of the cake with a knife.  I use a small pizza cutter for easy cutting... just roll and cut :). You can also buy a Fondant Cutter


Your cake is now ready to decorate.... like a blank canvas. Enjoy!!

Sunday, February 17, 2008

Barbie Doll Cake


I just made this cake this weekend. It was soooo much fun designing the dres and dressing her up in it.

The barbie cake is chocolate chocolate chunk cake iced with fudge. The rose cake is strawberry cake with strawberry filling and iced with white fluffy vanilla buttercream.

The dress is all fondant. The white decorations on the white portion of the dress are white buttercream icing piped with a small round tip. The rose cake is covered in white fondant. The ruffle is white buttercream and the roses are fondant. Check how to make fondant roses here.


Thursday, October 18, 2007

Superman Cake: Frozen Buttercream Tranfers (FBCT)

I was trying for the first time the Frozen Butter Cream Transfer technique. It turned out to be very easy and the end result is WOW.

What you need:

  • Wax paper
  • Pencil
  • Buttercream, buttercream... that's all!!! (medium consistency)


Instructions:
  1. Choose a template for your cake design (sometimes the template comes with the cake pan).
  2. Trace the cake design on wax paper. If using a molded pan, trace insert.
  3. Invert desing as we will have to transfer buttercream onto cake by flipping image (if using molded pan insert, don' t need to invert image as it is already inverted for you)
  4. Trace outline with black buttercream
  5. Fill the rest with buttercream (color of choice) with a piping bag using a round tip. Width of your choice. You can peek to see how image is coming out!
  6. In order to avoid gaps between colors, it is okay to overlap some of the buttercream on top of other. Don't mix.
  7. Place in freezer for one hour.
  8. Place wax paper over cake, with buttercream touching top of cake (the cake can be slightly frosted).
  9. Remove wax paper carefully and VOILA!!!


This is the end result cake:

broscake-002r2l.jpg

Wednesday, October 17, 2007

Getting Started: Cake Decorating

Kits with Everything You Need to get Started:

Wilton 101-Decorating Tool Set

Contains:


  • Tool caddy to organize, carry, and store the essentials
  • Collection of tools, colors, and food flavors to get you started
  • The tool caddy holds 48 tips and 12 paste food colors in a lift-out tray; upright storage prevents spills
  • Storage space for keeping your tools, such as: spatulas, bags, and other large supplies neatly organized
  • Tool caddy measures approximately 15 by 7 by 5 inches deep

Although the kit above is very complete, I really recommend starting with something smaller and adding the extra tools and stuff as you need them.

50-pcs Tool Set

  • Includes tool caddy to organize, carry and store essentials
  • Includes food coloring (prime colors)
  • Comes with instruction booklet with ideas and texhnoques
  • includes a practice boards with templates for trials.


Pans:


In order to avoid baking 2 cakes for a two layer cake, use a 3 inch deep cake pan. Just bake one cake and tort by half for two layers or divide them into more layers. I use the Wilton round pans and they work just perfectly for me..


8 x 3-Inch Round Cake
10 x 3-Inch Round Cake
12 x 3-Inch Round Pan

Featherweight bags:
Wilton Piping Bags (feather weight)

Although I love featherweight bags they are sold individually at a very expensive price (around $5 dlls each). In cake decorating you need plenty of them, specially if working with a lot of colors. I bought a couple of the featherweights and a bunch of the disposable ones. I use the disposable when I am using strong colors like red so I can always dispose them.

Piping Bags (diposable)

Decorating Tips and Tools:

The following is a good set, Master Tip Set
Measuring Cups and Tool Set

Tuesday, October 9, 2007

Fondant: Gift Wrapped Cake

I continued taking more fondant classes to be able to share with you all.

Once again, the cake was a moist chocolate with chocolate chips and filled with chocolate buttercream. This was then covered with white fondant. Then decorated the cake with a pastel pink fondant ribbon (come back for later posts with techniques). Then accented the cake with small flower fondant cutouts with pink centers.

This cake can be done with a square shaped cake... even better, make it a stack of 3 gifts on top of one another!!!!

Picture 1: The front of the cake


giftwrapped-cake-005sml.jpg


Picture 2: The back of the cake


Giftwrappedcake back


Click on this link to an earlier post for fondant information:
What is fondant?
Working with Fondant

Marshmallow Fondant Recipe
More Fondant Cake Pics

COMING SOON
How to Make Fondant Roses

Sunday, September 30, 2007

Buttercream Roses Cake

rosecake.jpg


Marble cake iced with buttercream and filled with dark chocolate mousse. Topped with 7 buttercream roses, dots and drop flowers on the bottom shell border.

This cake can be made using the following decorating tips: Delux Tip Set- 28 pcs or Master Tip Set-55pcs

Saturday, September 29, 2007

Icing Borders

Star Border

Hold decorating bag straight up (90 degree), slightly above the surface. Squeeze bag with heavy pressure and press out a star. Stop pressure and pull tip away. Increase or decrease pressure to change size of star. Do them close together for a border.

Note the border on this cake:
starborder.jpg

Note that the rainbow is made of lines of stars:
rainbow.jpg

Shell Border

Hold decorating bag at a 45 degree angle with tip slightly above surface. Squeeze with heavy pressure and slightly lift tip as icing builds and fans out into a shell. Relax the pressure in the bag as you pull the tip down to the right and you make the 'tail'. Stop pressure, pull tip away. When you make shells always work counterclockwise on the border of the cake if you are right handed. Start each new shell slightly behind the tail of the previous shell (avoid covering the tail of previous shell).

Zigzag Border

Position bag at 45 degrees angle to the surface, so that the tip is pointing to the left and fingers on the bag are facing you (if you are right handed). Allow the tip to touch the surface lightly. Steadily squeeze and move hand in tight side-to-side motion (please see clouds on rainbow below). Stop pressure and pull tip away to end. Make the zig-zag longer by moving the hand back and forth in desired length.


rainbow.jpg


Tip: make another ziz-zag cloud on top of the larger one with a short zig-zag length for a 3D effect.

Reverse Shell Border

Position bag at 45 degree angle with tip slightly above surface. Squeeze to let icing fan out as if you were making a typical shell, then swing tip around to the left in semi circular motion (like if you are making an spiral shape- counterclockwise) as you relax pressure to form tail of a shell. Stop pressure, pull tip away. Repeat procedure, only this time swing tip around to the right (clockwise) relax pressure and form tail of shell. Continue alternating directions to create the reverse shell border.


reverse-shellborder-sml.jpg


Rope Border


Hold bag at 45 degree angle to surface with end of bag pointing over right shoulder. Touch tip to surface and sqeezing bag move tip down, then up and a little bit down to form a sideways "s" curve.


ropeborder.jpg


Ruffle Border


rosefondantcake-0282.jpg


Snail Trail Border


slug border


Just added the last two pictures. Come back for instructions!!

Thursday, September 27, 2007

Buttercream: Cake Decorating: Rosettes

Rosettes Birthday Cake Picture

Tip: 16

Consistency: Medium

Rosettesrosettes.jpg

This technique is achieved in one continous rotation. They are used for border decorations, for toping a cake to achieve a modern look, as hair in some character cakes, and for candleholders on top of a cake.

Place the tip slighlty above the cake and form a big star. Move the tip sideways but on top of the star and complete a rotation (if you start at 12:00 continue pressure and rotation until you reach 9:00, relieve pressure and continue until 12:00 to complete rotation). Lift tip away and towards center of rosette. VOILA!!!

Buttercream: Cake Decorating: Star Tip Decoration

Use star tip to decorate cakes easily giving it a ridged icing texture. Use Medium consistency to make sure the stars stay in place and hold that sharp edge 3-D form.

  • Use start tip 21
  1. Fill a bag with medium consistency icing.

  2. Position the bag at a 90 degree angle (straight up) from the surface of the cake. Make sure the tip is not touching the cake. The tip should be about 2 millimeters away from the surface.

  3. Squeeze the bag without moving the tip until you reach the desired thickness of the star (big or small). This will form your star.

  4. Stop squeezing and pull away and up slowly (to make sure the icing stays on the cake and doesn't lift with the tip).


TIP- Star tip decorating for large cakes:

To cover a large area of a cake in a painless and faster way, use the Triple Star Tip. This tip will form three stars next to each other at once!!!!

Check out this tip sets: Master Tip Set-55 pcs and Delux Tip Set- 28 pcs.