An Expression of Art

Sunday, November 11, 2007

Nintendo Super Mario Brothers Cake

Someone asked me to make a cake for their birthday. I wanted to create something colorful and fun, so I came across Su-Yin's cake and decided to replicate it. This cake was fun to make. I started by making Mario which I knew would be more difficult than the rest. Once he was made, the rest came about easy.


cimg1804p2.jpg


Double click on the pictures below to enlarge the pictures and see all sides of the cake.

cimg1783r.JPGcimg1785r.JPG

cimg1793r.jpg

The cake is a marble chocolate-vanilla cake filled and covered with chocolate fudge, then covered with marshmallow fondant (MMF). Mario's body is filled with bread and covered with marshmallow fondant. All decorations are MMF.

Sunday, November 4, 2007

Royal Icing: Daffodil

Daffodil


I have moved to a difficult flower, however, the difficulty only lies in the several steps that it takes to create the flower and not the handling of the piping bag.


Materials


Prepare one bag with tip 104; another with tip 3 and another with tip 1 - All filled with yellow royal icing.

Instructions


1. Prepare your flower nail by placing a square of wax paper on top of it, secured with some icing. Looking down on your flower nail, imagine dividing the nail in 6 equal parts.
2. Using your tip 104 make the first petal (yellow royal icing). Squeeze bag lightly at 45 degree angle, sliding to outer edge and when it reaches the outer edge spin nail to fan royal icing and return to starting point to close loop by relaxing pressure and sliding out (think of it as an upside down U- see upper left corner of picture).
Petal depicted in orange for visibility. Space in the middle will not be there, but marked as seen to trace the movement of the tip.
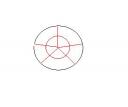
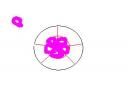
3. Repeat to make a total of 6 petals.

4. Dip your fingers in cornstarch and pinch outside of each petals to make them pointy


Flower Center

1. Start by making a flat dot at the center of the dot with tip 3. Then move in a circular motion to create a coil that opens up (like a tornado shape) – base should be narrower than the top. Stop and lift away.

Center depicted in black to show tip movement. Spiral on top like a coil.

2. With tip 1 bag, add a zigzag trim to the top edge of the coil.

Trim depicte in pink for visibility. Double click to enlarge.

3. Dry in small flower former to give a slight cupped shape to flower


Royal Icing: Daisy

Daisy
Refer to Flower Index for other flower links.

Materials


Although daisies are found in anture with white petals and yellow centers, it is fun to make them in any color you want in order to march the theme of your cake.
Instructions

1. Prepare your flower nail with a square of wax paper (glue it with a little icing). Looking down on your flower nail, imagine dividing the nail in 12 parts as follows:

2. Position your bag with tip 104 parallel to head of your nail. Wide end close to outer edge and narrow edge angled up slightly. Squeeze slightly and slide tip towards center. Voila, your first petal. Do the north, west, east and south petals.


3. Repeat for total of 12 petals.


4. Add center with tip 5, by making a dot and then pressing with your fingers lightly (depicted in orange for visibility)

5. Dry in medium flower former to give shape to flower.


Flowers in Flower Former:


Monday, October 29, 2007

Chocolate Marshmallow Fondant (Choco MMF)

Follow instructions to MMF recipe HERE. You will add the following ingredients to recipe above.

  • 1 oz melted semi-sweet or bittersweet chocolate
  • 1 tbsp cocoa powder (it can be either Dutch-process or natural - the later will give a more pronounced flavor)*
  1. Follow Instructions on MMF recipe from Step1 to 3, for melting the marshmallow. Once these are melted, stir melted chocolate in a mixing bowl until well incorporated. Set aside.
  2. Here is the change to the MMF recipe. Instead of just adding the sugar, place the sugar in a small mixing bowl and sift the cocoa powder in a small mesh strainer over the sugar. Mix the dry ingredients.
  3. Proceed to step four, sift sugar and cocoa mix over the melted marshmallow and continue the instructions, i.e., mix until well incorporated.
  4. Continue with the kneading (this is hot- wait until it cools a little or start kneading with a spoon until safe to the touch).

*Variations to this recipe:
- You can also use white chocolate by substituting 1 oz of semi-sweet chocolate and 1 tbspoon of cocoa powder with 2 oz of white chocolate.

Tuesday, October 23, 2007

Royal Icing: Violet Leaves

Violet leafs add a pleasant full look to cakes. Since violet flowers are too small, I like placing them under the flower to bring out its details. Refer to Flower Index for other flower links.

Violet Leaf


Instructions:


  1. Looking down on your flower nail, imagine dividing the nail in half; Then in two quarters.
  2. Squeeze royal icing on one quarter of the nail slightly. Go up by using a jiggling or zig zag motion (another way to describe it is to do multiple ‘n’ letters
  3. When you reach the top slide tip out a little bit and ‘fan’ the royal icing as you turn the nail.
  4. Continue down the path (second quarter) in a jiggling motion moving back to starting point.
  5. Dry in medium flower former to give a slight cupped shape to leaf.


Link to how to make Violet Flowers (flower shown above)

Royal Icing: Violet Flower

Violets add a lot of color to cakes. You can make them any color you want to match the theme of your cake. These can be used as filler or as the main flower theme. Refer to the Flower Index for other flower links.

VIOLET FLOWER

INSTRUCTIONS:

  1. Looking down on your flower nail, imagine dividing the nail as follows: Note that the flower should be the size of the inner circle

  2. Using your tip 101 make the first bottom petal (violet, white or pink royal icing). Squeeze bag lightly at 45 degree angle, to make and upside down U (depicted on the upper left corner of picture below). Make sure that the U closes at the end – relax pressure, unite with the starting point, stop and slide out.
  3. Repeat to make two more bottom petals.
  4. Make two shorter rounded top petals
  5. Add two center dots with yellow royal icing (tip 1).
  6. Dry in small flower former to give a slight cupped shape to flower.

Royal Icing: Apple Blossom

By popular demand, I am starting a series of post with step-by-step instructions (Refer to Flower Index for links to other flowers). Royal icing flowers are beautiful and the end result will leave you deeply satisfied. They embellish everythig: cakes, cupcakes and even cookies. I would like to mention that making these flowers may be difficult at the beginning, but the skills are not difficult to acquire. Lets start with easy ones and move on to more difficult ones.

Apple Blossom


NOTE: These flowers are often used as filler flowers. Try them on simple cupcakes to embellish them.

Instructions:


1. Looking down on your flower nail, imagine dividing the nail in 5 equal parts.

applebossom.jpeg

*Note that the flower should be the size of the inner circle.

2. Using your tip 101 make the first petal (white or pink royal icing). Squeeze bag lightly at 45 degree angle, to make and upside down U (depicted on the upper left corner of picture below). Make sure that the U closes at the end – relax pressure, unite with the starting point, stop and slide out.- Repeat to make four more petals (a total of 5)

applebossom2.jpg
3. Prepare bag with tip 1 and fill with yellow royal icing. Add one dot in the center and four more on the outside as seen below.

applebossom3.jpg

4. Dry in small flower former to give a slight cupped shape to flower. Apple blossom is bright pink flower on lower left corner.


Link to Cake Picture with these flowers.

Sunday, October 21, 2007

Transporting Cake and Tools

I have found the most convenient way to transport cakes. I have to do this often, and most of the cake caddies that I have found do not have secure locks with wide and steady handles. Try this 3-in-1 Cake Caddy, so far it is being so helpful and very convenient. It has a deep cover for tall cakes. Also, you can tranpost cupcakes!!!!

If you are new at cake decorating, you can buy the 50pc tool set by Wilton. The kit includes tips, couplers, spatula, decorating brush, featherweight decorating bags, food coloring, a board for practicing decorating with frosting and an instruction booklet all enclosed in a very useful caddy. Check it out!!Also, there is a bigger kit by wilton with 101 pcs, but I think the 50 pcs tool set will do. You can add whatever is missing by buying them individually as the need arises.


Friday, October 19, 2007

Marshmallow Fondant - Small Round Pillow with Roses Cake

I made this small round cake for a friend's tea call (same day quick cake). The fondant used for the drape, border and to cover the cake were made from scratch with Marshmallow Fondant (MMF) and covered with some pearl dust to give it a shine (I am not sure if you can tell from this picture). I didn't try to use MMF for the flowers, as I had these made previously. If I had used MMF for the roses, I would have made them when the MMF was still fresh and warm (just made). I find that it is easier to roll fondant very thin when it is just made. Easier than commercial fondant.


I had made and stored this MMF for a week so it was a little hard to roll it thin. By heating it a little bit in the microwave, it made it easy to knead again. The cost to make MMF is around $3dlls - compare with store bought ($20dlls/5lbs). Remember, MMF fondant tastes waaaay better than commercial fondant.


small rose round pillow cake


Coming Soon!!
Theme Marshmallow Fondant Cake: Super Mario Brothers

Thursday, October 18, 2007

Superman Cake: Frozen Buttercream Tranfers (FBCT)

I was trying for the first time the Frozen Butter Cream Transfer technique. It turned out to be very easy and the end result is WOW.

What you need:

  • Wax paper
  • Pencil
  • Buttercream, buttercream... that's all!!! (medium consistency)


Instructions:
  1. Choose a template for your cake design (sometimes the template comes with the cake pan).
  2. Trace the cake design on wax paper. If using a molded pan, trace insert.
  3. Invert desing as we will have to transfer buttercream onto cake by flipping image (if using molded pan insert, don' t need to invert image as it is already inverted for you)
  4. Trace outline with black buttercream
  5. Fill the rest with buttercream (color of choice) with a piping bag using a round tip. Width of your choice. You can peek to see how image is coming out!
  6. In order to avoid gaps between colors, it is okay to overlap some of the buttercream on top of other. Don't mix.
  7. Place in freezer for one hour.
  8. Place wax paper over cake, with buttercream touching top of cake (the cake can be slightly frosted).
  9. Remove wax paper carefully and VOILA!!!


This is the end result cake:

broscake-002r2l.jpg

Contemporary Cake

I wanted to make a cake that was contemporary and artistic. I tried the following 2 layer 6 inch cake. Imagine this as a 2 tier cake!! It would look wonderful!!

I tried a new chocolate recipe (chocolate cake with chocolate pudding and chocolate chips) filled with dark chocolate truffle mousse. I covered the cake with chocolate butter cream for the fondant to stick to and then covered it with white fondant. The cake was then decorated with orange fondant cutouts in different circle shapes.

Double click on the picture to enlarge it:

Contemporary Fondant


contemporary fondant whole


The cake was so moist and delicious. It stayed like that until it was gone!!!

Click on this link to an earlier post for fondant information:
What is fondant?
Working with Fondant
Marshmallow Fondant Recipe
More Fondant Cake Pics

Coming SOON!!
How to Make Fondant Roses

Wednesday, October 17, 2007

Getting Started: Cake Decorating

Kits with Everything You Need to get Started:

Wilton 101-Decorating Tool Set

Contains:


  • Tool caddy to organize, carry, and store the essentials
  • Collection of tools, colors, and food flavors to get you started
  • The tool caddy holds 48 tips and 12 paste food colors in a lift-out tray; upright storage prevents spills
  • Storage space for keeping your tools, such as: spatulas, bags, and other large supplies neatly organized
  • Tool caddy measures approximately 15 by 7 by 5 inches deep

Although the kit above is very complete, I really recommend starting with something smaller and adding the extra tools and stuff as you need them.

50-pcs Tool Set

  • Includes tool caddy to organize, carry and store essentials
  • Includes food coloring (prime colors)
  • Comes with instruction booklet with ideas and texhnoques
  • includes a practice boards with templates for trials.


Pans:


In order to avoid baking 2 cakes for a two layer cake, use a 3 inch deep cake pan. Just bake one cake and tort by half for two layers or divide them into more layers. I use the Wilton round pans and they work just perfectly for me..


8 x 3-Inch Round Cake
10 x 3-Inch Round Cake
12 x 3-Inch Round Pan

Featherweight bags:
Wilton Piping Bags (feather weight)

Although I love featherweight bags they are sold individually at a very expensive price (around $5 dlls each). In cake decorating you need plenty of them, specially if working with a lot of colors. I bought a couple of the featherweights and a bunch of the disposable ones. I use the disposable when I am using strong colors like red so I can always dispose them.

Piping Bags (diposable)

Decorating Tips and Tools:

The following is a good set, Master Tip Set
Measuring Cups and Tool Set

Tuesday, October 16, 2007

Tips: Smoothing a Cake

If you used meringue powder in your icing, wait 5-10 mins after icing the cake until this dries. Cut a large piece of wax paper and place it on top of the iced cake and smooth it with your hands by sliding your hand on top of the wax paper. Do the same for the sides of the cake. This will make your cake look smooth. Repeat steps if necessary.


cimg0502.JPGcimg0501.JPG


Another method that I prefer very often is the "viva" method. Viva is the brand of a paper kitchen towel. Place smooth side of the towel touching crusted buttercream frosted cakes on top. Slide your hand in circular motion gently across the towel without pressing hard. Once you assess how much pressure you can use, then you can press slightly until you get a smooth cake. For me, this works better than wax paper and it is very easy to use. The towel doesn't stick to the buttercream, but always starts by using slight pressure until you get a hold of it.

Sunday, October 14, 2007

Icing Color Bleeding

I've been asked several times if I have something to say about 'color bleeding'. By using the frosting recipes shown here and gel food coloring, I have never faced this problem. However, color bleeding is caused by many reasons. During the cake decorating classes that I have taken, I have always heard that other's cake frosting or cookie decorations have faded.

The primary reason was that they were left to direct SUN-LIGHT EXPOSURE. Make sure your cakes or cookies are not exposed to direct sun-light as this can fade the colors.

Also, MOISTURE is not good for frosting as this may cause the colors to bleed. Make sure your frozen cakes are completely thawed before you decorate them with colored frosting. The moisture from the frozen cake as it thawes will 'sweat' and dilute frosting ruining its consistency and in some cases diluting the color. Also, when you store your cake, do not cover it in an air-tight container as the cake will sweat if the heat rises.

When using COLOR FLOW, if the outline color is diferent than the filling, make sure you let the outline dry for a couple of hours before you proceed to filling your piece as this may cause bleeding.

If anyone reading this has any more comments to add, please feel free to do so. The purpose of this blog is to share our knowledge, please help us achieve that.

Black Buttercream Icing

I often hear people complain that their black icing did not come quiet black. Here is some good advice: a true shade of black cannot be obtained from white icing. The black coloring will reduce to a gray or a very dimmed black color. Before you start coloring, start with a chocolate icing, i.e., add cocoa powder to your icing before the black coloring.

Try working with gel colors (I like both Wilton and Americolor Gel food coloring), which to my opinion, pick up the color better than liquids and won't change the consistency of your icing. This become very handy when working with royal icing and fondant which can change the consistency or make it hard to work with.

Friday, October 12, 2007

Marshmallow Fondant Recipe (MMF)

Ingredients:


Instructions:

  1. Grease a microwaveable bowl with shortening. Add all mini marshmallows, clear vanilla, butter flavoring and water

  2. Microwave for 60 seconds. Remove from microwave and stir until completely melted with fork

  3. If all the mini marshmallows don't melt after stirring, return to microwave for 30 seconds and sitr (repeat in itervals if necessary) - this step is usually not necesary for me

  4. Add the powdered sugar gradually (you might not need all the sugar) and process at low speed until well incorporated, then increase speed (if you don't have a stand mixer, mix with fork until well incorporated then knead)

  5. Powder surface with powder sugar. Knead marshmallow mix (careful, it might be hot at this point so knead with fork until it cools down a bit. You can grease your hands if you like to avoid marshmallow sticking to your hands). Kneading should not take long.

  6. If the mix is too sticky, then add more sugar until it becomes firmer

  7. Knead into a loaf (it will be a little bit soft at this point but don't worry). Wrap in plastic and cool for one hour (it will get firmer then)

  8. You can store on dry place or refrigerator (it will store for weeks)

    mmf-cropped.jpg


TIPS:
- Roll MMF same day you made it when a little warm to get a really thin rolled fondant.

- Let the refrigerated fondant sit for a while at room temperature before use. You can speed the process by microwaving the fondant for 10 seconds and knead again.

- If it is too dry when you knead your fondant, add water and knead again.