Double Click to enlarge Pic

Materials
- Tip: #47
- Icing: Buttercream
- Icing Consistency: Medium
Instructions
- Prepare your cake: tort and frost with same color of icing as your basket.
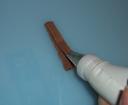
- Fill prepared tip 47 icing bag with medium consistency buttercream.
- In order to create straight lines (if you are not ready to eyeball it) we have to imaginarily divide the cake in equal parts and mark the edges with a spatula.
- If you have a round cake, mark the half of the cake (or diameter) with a spatula just by touching the edge and making a small indentation.
- Divide another half across the diameter (that is, divide by quarters).
- Divide again by 8ths, then divide again by 16ths.
- I am sure you get the idea by now, so if you have a square cake or oval cake, divide it by equal parts.
- Place your spatula parallel to the side (wall) of the cake and indent a line where you marked the edge of the cake. Continue this around the cake to have 16 vertical lines (16th parts).
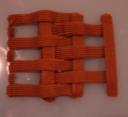
Using your prepared tip 47 icing bag, place the tip with serrated side pointing upwards and make one vertical line (use the vertical lines that you marked in the cake to guide you). Since this is our first line we have to make another vertical line on top of this one (2 layers) to make sure it will be in level with the rest as we progress. *Double click on pics to enlarge*
- Make a horizontal icing line across the vertical icing line (to make a letter T) using the width of your previous marked line until the next marked line (that is, cover two parts).
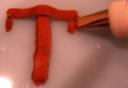
- Use your tip 47 and pipe a small piece of icing to mark the width of spacing between horizontal lines as shown above (always mark spacing with your tip or you will end up with a loose basket).
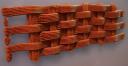
- Create your second horizontal line parallel to the top vertical line. Repeat until you finish covering your vertical line.
- Make another vertical line (one layer from now on) on the secong imaginary line, now covered by the ends of your horizontal line and space markers.

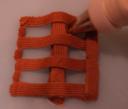
- Insert tip gently under previous vertical line (as shown in picture below) and create a horizontal line across second vertical line (tip: do not touch vertical line when piping, simply lift icing upwards and let it fall over vertical line - this will prevent the icing from sinking)
- Repeat process. (step 7-8)
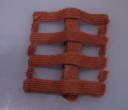
- I am sure you get the idea now, repeat the process until you have completed the 16 divided parts of the cake.
Practice with an upright board if you want to get a more realistic feel
Variations
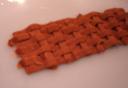
I like the serrated side of the tip as it gives the basket weave some texture. You can use the flat side of the tip to create a different texture for your basket (see picture below).
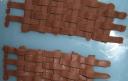
You can use a round tip (tip 7) to create the vertical lines and the serrated tip 47 to create the horizontal lines. This creates a wonderful basket as well.
6 comments:
Great explanation of the basket-weave technique:) Looking forward to try it on my next cake:)
Thanks x 1000
Lars, Norway
Thanks for the info. Best explanation on the internet for doing a basket. Making one this week and needed to know how to do it. Thanks for taking the time out to post!
Jim
Florida
Beutiful!!!!!!!!!!!!!!!!!!
I'm very new at designing cakes and i wanted to try and make this one for my mom for mother's day.... but i was wondering the basket was drawn directly on the cake after icing the cake?
Hi ~~DaNi~~ ... Yes, you have to ice the cake first, then you pipe the basket on top.
Wonderfully Explained,,
Post a Comment