
Marble cake iced with buttercream and filled with dark chocolate mousse. Topped with 7 buttercream roses, dots and drop flowers on the bottom shell border.
This cake can be made using the following decorating tips: Delux Tip Set- 28 pcs
Star Border
Hold decorating bag straight up (90 degree), slightly above the surface. Squeeze bag with heavy pressure and press out a star. Stop pressure and pull tip away. Increase or decrease pressure to change size of star. Do them close together for a border.
Note the border on this cake:
Note that the rainbow is made of lines of stars:
Shell Border
Hold decorating bag at a 45 degree angle with tip slightly above surface. Squeeze with heavy pressure and slightly lift tip as icing builds and fans out into a shell. Relax the pressure in the bag as you pull the tip down to the right and you make the 'tail'. Stop pressure, pull tip away. When you make shells always work counterclockwise on the border of the cake if you are right handed. Start each new shell slightly behind the tail of the previous shell (avoid covering the tail of previous shell).
Zigzag Border
Position bag at 45 degrees angle to the surface, so that the tip is pointing to the left and fingers on the bag are facing you (if you are right handed). Allow the tip to touch the surface lightly. Steadily squeeze and move hand in tight side-to-side motion (please see clouds on rainbow below). Stop pressure and pull tip away to end. Make the zig-zag longer by moving the hand back and forth in desired length.


Rosettes Birthday Cake Picture
Tip: 16
Consistency: Medium 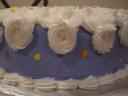

This technique is achieved in one continous rotation. They are used for border decorations, for toping a cake to achieve a modern look, as hair in some character cakes, and for candleholders on top of a cake.
Place the tip slighlty above the cake and form a big star. Move the tip sideways but on top of the star and complete a rotation (if you start at 12:00 continue pressure and rotation until you reach 9:00, relieve pressure and continue until 12:00 to complete rotation). Lift tip away and towards center of rosette. VOILA!!!
I made this cake for a friend's birthday using the startip to make rosettes. She and the guest enjoyed it very much!!!! Added long sparkling candles to match the theme.

About this cake:
Cake: Marble cake with dulce de leche filling.
Frosting: Buttercream.
Decoration and color: Colored cake icing with 'violet' gel. Used white rosettes to top the cake. White shell border on bottom border. Sprinkled edible confetti.
Check out Buttercream Icing recipe and rosettes technique as shown on picture above. Imagine this on a 2 tier cake with rosettes overflowing the top tier...
Use star tip to decorate cakes easily giving it a ridged icing texture. Use Medium consistency to make sure the stars stay in place and hold that sharp edge 3-D form.
Ingredients:

The 20 minute rule:
Allow the cake to cool 20 minutes after you remove it from the oven in the cake pan (this will allow the cake to take its shape and be easily unmolded). If you unmold the cake before the 20 minutes the cake may break, if you wait longer than 20 minutes, the cake can stick to the pan making it difficult to unmold. The 20 minute rule works perfectly every time.
TORTING:
Unmold the cake by turning it upside down.
Note that the base of the cake will be the top of the cake (the flat surface).
Allow 40 minutes to cool the cake. Do not tort a warm cake as it can crumb and not tort evenly.
If the cake is 3 inches tall, you only need to bake one cake per tiara. If it is 2 inches tall, you have to bake 2 cakes to form one level.
For a 3" Cake:
FILLING:
Place the base of your cake on top of a "cake round" covered in foil.
You can "glue" the cake to the cake round by using a dollop of icing.
Fill a decorating bag with Icing with a round tip size 12.
Squeeze the bag at the edge of the cake and create a "barricade" around the outside edge of the cake layer (a circle of icing). This will prevent the filling from spilling out and will help 'glue' the cake layers together.
Now fill inside the circle with icing, pudding or preserve.
Place the next layer on top, making sure it is level.
ICING THE CAKE:
There are two ways to ice a cake. Using a Cake Icer Tip or by using a spatula only.
Using Cake Icer Tip:
Cut the bottom of a disposable 16" cake decorating bag to fit tip 789 (Wilton Cake Icer Tip). Please note that a coupler is not needed.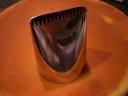
Fill bag with icing.
Starting on top of the cake, place the serrated side of tip to surface of the center of the cake and squeeze the icing in a continous spiral motion to cover the top.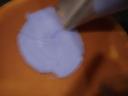
For the sides of the cake, place the tip close to the cake and squeeze icing while rotating the the cake. Do this several times until you cover the cake.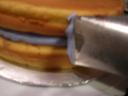
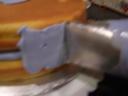
Using your spatula, place the edge of the spatula over the iced side and rotate the cake to smooth it. Do not lift spatula. Make sure that the spatula only touches the icing and not the cake to prevent from lifting crumbs. Excess icing can be returned to the bowl with icing.
Smooth the top last by placing the spatula against the icing and rotating the cake. Return the excess of the icing to the bowl.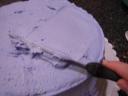
Repeat the procedure to make sure all sides are smoothed. You can apply icing to the cake as necessary.
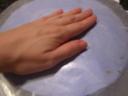
TIP: If you used meringue powder in your icing, wait 5 minutes until the icing dries. Cut a large piece of wax paper and place it on top of the iced cake and smooth it with your hands by sliding your hand on top of the wax paper. Do the same for the sides of the cake. This will make your cake look smooth.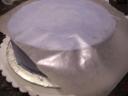
Using the spatula only:
Using a spatula place a large amount of icing on the top center of the cake.
Spread across the top pushing the icing to the sides of the cake. Use short strokes with the spatula to cover the top
Use more icing if needed to cover the sides of the cake. Place the edge of the spatula over the iced side and rotate the cake to smooth it. Do not lift the spatula, keep a steady hand. Make sure that the spatula only touches the icing and not the cake to prevent from lifting crumbs. Excess icing can be returned to the bowl with icing.
Repeat the procedure to make sure all sides are smoothed.
I often hear people complain that their black icing did not come quiet black. Here is some good advice: a true shade of black cannot be obtained from white icing. The black coloring will reduce to a gray or a very dimmed black color. Before you start coloring, start with a chocolate icing, i.e., add cocoa powder to your icing before the black coloring.
Try working with gel colors, which to my opinion, pick up the color better than liquids and won't change the consistency of your icing. This become very handy when working with royal icing and fondant which can change the consistency or make it hard to work with.
Add to the Buttercream Icing 3/4 cup of cocoa or 1 oz. of unsweetened melted chocolate and 1-2 tablespoons of water or milk to the recipe. Mix until all ingredients have been mixed thoroughly.
HINT: to achieve a darker color you can use brown or black coloring on the recipe until you achieve the color desired.
Buttercream icing Recipe
STIFF consistency is used for making roses and flowers with stiff petals. If the icing is not stiff enough the flower petals will fall. If the Icing is too stiff the petals can crack.
This an example of a drooping rose (the consistency wasn't stiff enough):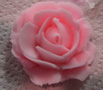
Note that the petals are falling and the rose doesn't look natural.
Test the consistency of your icing to know when you have achieved STIFF consistency.
Take a small amount of icing between your fingers. If you can roll a little ball with no residue left in your fingers, you know the icing is TOO stif and your petals may break. Add a little more water and mix.
If you can roll a ball between your fingers and leave a small residue, the consistency is good to go.
A stiff consistency will allow you to make STIF peaks of icing as depicted in the picture below:
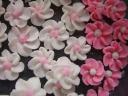
MEDIUM consistency is used for star tip decoration, borders, fiigure piping (3-dimensional shapes), flowers without stiff petals and bows.
The picture below are flowers made with medium consistency icing:
THIN consistency is used for icing the cake, lettering, outlines, dots, leaves and vines decoration.
The recipe shown here contains shortening. You can substitute the shortening with butter (see amount below**). However, this wilton recipe with shortening is one of the best for making flowers and roses, since the shortening helps create a good icing texture and consistency for decorating.
In one large bowl, cream the shortening, flavoring, water. Add the sugar and meringue powder in intervals while mixing on slow speed until the ingredients have mixed. Stop the mixer and scrape down the sides of the bowl with a Rubber Spatula. Continue mixing at medium speed until all indredients have mixed thoroughly.